Let’s Encrypt is a new certificate authority which aims to make the web a safer place by giving free certificates to everyone who needs and wants them. Not only are the certificates free; they are also very easy to get and install thanks to the client program they’ve developed.
The documentation is pretty good but here’s a quick run down on how I downloaded the client software, requested certificates for two domains, and configured Nginx to use them.
# Clone the letsencrypt client from GitHub.
git clone https://github.com/letsencrypt/letsencrypt
cd letsencrypt/
# Use the client to request a certificate for my domains.
./letsencrypt-auto certonly --webroot \
    -w /srv/example.com/htdocs/ \
    -d www.example.com \
    -d example.com
./letsencrypt-auto certonly --webroot \
    -w /srv/example.org/htdocs \
    -d www.example.org \
    -d example.org
Let’s break down those letsencrypt commands:
certonlyget a certificate but don’t, e.g., install it;--webrootand-w /srv/.../htdocs/authenticate the request by putting some files in the web root for the domain;-d www.example.com -d example.cominclude these names in the certificate.
Running letsencrypt this way means I don’t have to figure out how
the plugins for Apache or Nginx will try to install the certificate,
or shut down out existing web-server so that letsencrypt and run
its own server to authenticate the request: all it will do is create
authentication files in the web root and then put the certificates in
/etc/letsencrypt/.
Configuring Nginx
First I’ll generate some custom Diffie-Hellman parameters for our system to use. Using unique (or non-default) parameters helps to prevent attackers with lots of computing power from cracking encryption keys your server negotiates with clients.
sudo mkdir -p /etc/nginx/ssl
sudo openssl dhparam -out /etc/nginx/ssl/dhparam.pem 2048
Next I can configure things like protocol versions and cipher suites
which the server should support. There’s no go reason to vary these
between the different sites hosted by our server, so I’ll put them in
the global http section of the Nginx configuration.
ssl_dhparam /etc/nginx/ssl/dhparam.pem;

ssl_protocols TLSv1 TLSv1.1 TLSv1.2;

ssl_ciphers "EECDH+AESGCM:EDH+AESGCM:ECDHE-RSA-AES128-GCM-SHA256:AES256+EECDH:DHE-RSA-AES128-GCM-SHA256:AES256+EDH:ECDHE-RSA-AES256-GCM-SHA384:DHE-RSA-AES256-GCM-SHA384:ECDHE-RSA-AES256-SHA384:ECDHE-RSA-AES128-SHA256:ECDHE-RSA-AES256-SHA:ECDHE-RSA-AES128-SHA:DHE-RSA-AES256-SHA256:DHE-RSA-AES128-SHA256:DHE-RSA-AES256-SHA:DHE-RSA-AES128-SHA:ECDHE-RSA-DES-CBC3-SHA:EDH-RSA-DES-CBC3-SHA:AES256-GCM-SHA384:AES128-GCM-SHA256:AES256-SHA256:AES128-SHA256:AES256-SHA:AES128-SHA:DES-CBC3-SHA:HIGH:!aNULL:!eNULL:!EXPORT:!DES:!MD5:!PSK:!RC4";

ssl_stapling on;
ssl_prefer_server_ciphers on;

ssl_session_cache shared:SSL:50m;
ssl_session_timeout 5m;
On my machine, I put them /etc/nginx/conf.d/security.conf and
included that file in nginx.conf but that’s highly specific to my
setup.
It’s worth noting that this configuration will not work for some older clients which do not support, e.g., Server Name Indication or modern cipher suites. I completely comfortable with people using older clients not being able to access my sites but you might not be.
Per-site configuration
Now all that’s left to do is the site-specific configuration. I keep each site configuration in a different file for ease of management. Here’s what one of the domains above look like:
server {
  listen                *:443 ssl;

  server_name           example.com;

  ssl_certificate         /etc/letsencrypt/live/www.example.com/fullchain.pem;
  ssl_certificate_key     /etc/letsencrypt/live/www.example.com/privkey.pem;
  ssl_trusted_certificate /etc/letsencrypt/live/www.example.com/cert.pem;

  # ...
}
I also have a few related entries to redirect all HTTP requests to
HTTPS and all requests with www.
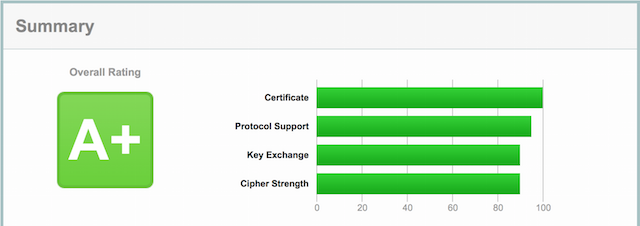
That’s basically it. Check that the configuration is valid with sudo nginx -t and, if so, restart Nginx! Check that everything works in
your browser and then use a service like Qualys SSL Labs SSL Test
which will test your new HTTPS configuration for known problems. If
your configuration is like mine you should get a result like this: